Running Performance Tests
Features
Performance Plugin for Jenkins uses Taurus Tool to execute load tests. Main benefit of Taurus is that it provides abstraction layer over popular Open Source tools, including: Apache JMeter, Gatling Tool, Grinder, Locust.io and even Selenium. You can run any of these load injectors from Jenkins build step with minimal prerequisites.
Prerequisites for Jenkins server: have Python 2.7+ installed together with one of virtualenv or bzt PyPi packages installed.
Internally, build step will run Taurus tool, doing some extra work around it:
- it will search for global
bztavailable, if none found it will try to usevirtualenvto install one locally into workspace - it will run
bztwith provided configs and options - it will set job status based on
bztexit code, making it unstable or failed - it will automatically generate performance trend report after
bztfinishes
Build step tries to minimally interfere with Taurus tool to let you use its full capabilities (Taurus is pretty feature-rich thing for running tests).
Test runner step works fine with Jenkins slaves, as well as with Pipeline syntax (see section below.)
Jenkins GUI Configuration
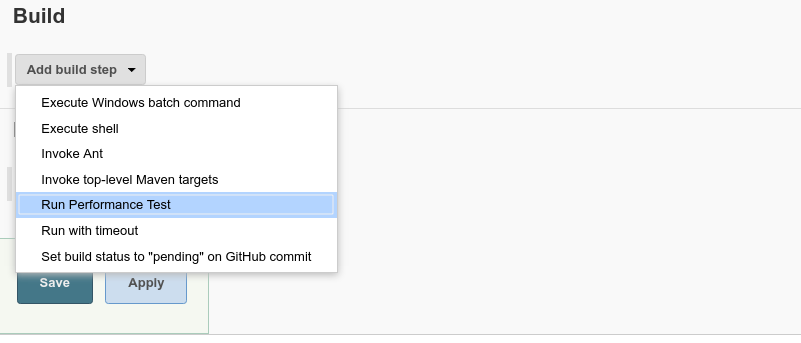
If you are using GUI-based job configs for Jenkins, choose “Run Performance Test” step from “Add build step” menu:
In the field that appears, you can simply specify path to your JMeter test plan file. This is Taurus capability due to high popularity of JMeter:

If you want to use extended capabilities of Taurus, you can specify its config files and options in ‘Taurus Tool parameters’ field. Generally, value of that field is what will go into command line parameters of bzt program.
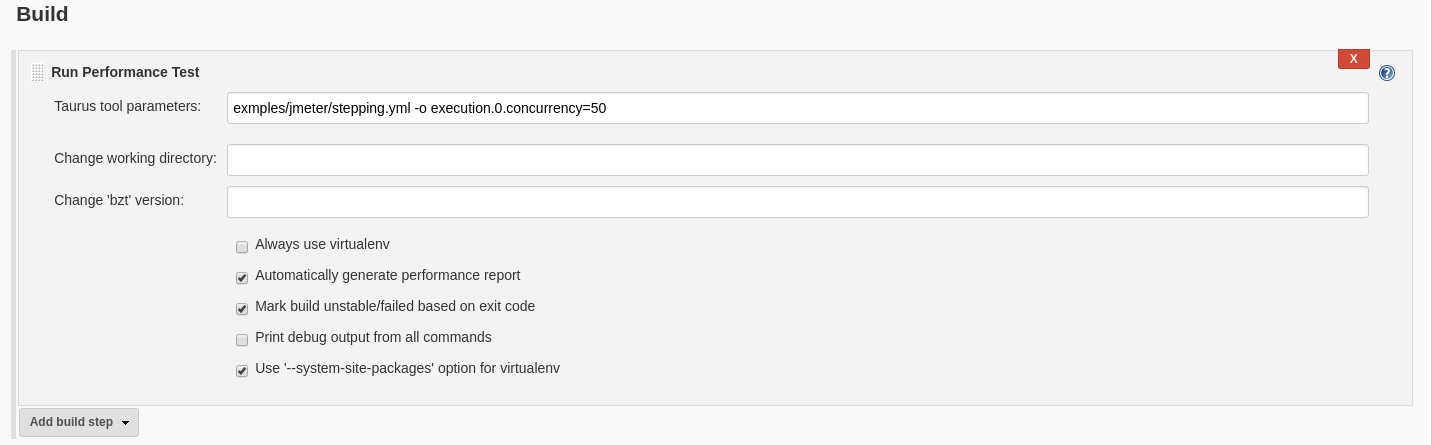
Clicking on “Advanced…” will open several options that can alter build step behavior:
- Change working directory - set working directory in which test will be run, by default will be used build workspace
- Change ‘bzt’ version - set
bztversion that will be installed inside avirtualenv, by default will be installed the latest version. If version is URL or path to file then it will be installed - Always use virtualenv - enable this flag if you want to install
bztintovirtualenv - Automatically generate performance report - enabled by default, builds performance trend report from Taurus execution results, you can turn it off if you don’t need report
- Mark build unstable/failed based on exit code - enabled by default, will mark build step failed if Taurus exit code is 1, and will mark it unstable if it’s another non-zero exit code
- Print debug output from all commands - enable this flag if you are experiencing
bztinstallation issues and want to get more debugging information into console log - Use ‘–system-site-packages’ option for
virtualenv- enabled by default, it speeds up automatic installation ofbztinto workspace, advanced users might want to turn it off
Using from Pipeline Scripts
Here’s example pipeline script to use build step with bzt command that maps to Taurus Tool invocation.
node {
    stage("clean") {
        cleanWs()   // requires workspace cleanup plugin to be installed
    }

    stage('get config file') {
            sh "wget https://raw.githubusercontent.com/Blazemeter/taurus/master/examples/jmeter/stepping.yml"
    }

    stage("run test") {
        bzt "stepping.yml"
    }
}
Other Ways to Run Test in Jenkins (deprecated)
Using jmeter in a ‘MAVEN’ project
Follow the instructions in this article
Using jmeter in an ‘ANT’ project
Although there are different ways to run jmeter tests, here is explained a method to run them using ant.
Once you have your build.xml ready to run jmeter, you can add your project to Jenkins as a Freestyle-project which uses ant, and configure it following the instructions above.
Finally run your project setting the property jmeter-home to the appropriate folder in your computer: ant "-Djmeter-home=C:\jmeter" -f build.xml
<project default="all">
  <!-- ant-jmeter.jar comes with jmeter, be sure this is the release you have -->
  <path id="ant.jmeter.classpath">
    <pathelement
       location="${jmeter-home}/extras/ant-jmeter-1.1.1.jar" />
  </path>
  <taskdef
    name="jmeter"
    classname="org.programmerplanet.ant.taskdefs.jmeter.JMeterTask"
    classpathref="ant.jmeter.classpath" />
  <target name="clean">
    <delete dir="results"/>
    <delete file="jmeter.log"/>
    <mkdir dir="results/jtl"/>
    <mkdir dir="results/html"/>
  </target>
  <target name="test" depends="clean">
    <jmeter
       jmeterhome="${jmeter-home}"
       resultlogdir="results/jtl">
      <testplans dir="test/jmeter" includes="*.jmx"/>
      <property name="jmeter.save.saveservice.output_format" value="xml"/>
    </jmeter>
  </target>
  <!-- This is not needed for the plugin, but it produces a nice html report
       which can be saved usin jenkins's archive artifact feature -->
  <target name="report" depends="test">
    <xslt
       basedir="results/jtl"
       destdir="results/html"
       includes="*.jtl"
       style="${jmeter-home}/extras/jmeter-results-detail-report_21.xsl"/>
  </target>
  <target name="all" depends="test, report"/>
</project>